Showing posts with label pinterest wedding. Show all posts

Wednesday, June 10, 2015

Wedding Wednesday Recap Part 2

If you missed the first edition of my Wedding Wednesday Recap you can find it here. Today I am sharing with you the second section of Wedding Wednesday posts. I'm going to be sharing my favorite part of each post and giving you a little more information about my wedding. To read all about my love story check out all about me and Jarr here.  Now on to the good stuff!

Week 7- Isle Decorations, this was so fun to look up and find ideas that I liked for our wedding ceremony. I didn't realize how complex some people make their isle decorations but it also made me really grateful that we are getting married outside in a gorgeous location. So little decorations are needed and that makes things a lot easier on us!


This is by far my most favorite isle decorations. I love the combination of the flower petals and the variety of candles together. I would definitely be doing this if we were having our wedding at night time or when the sun was setting. 


Week 8- How About That Party, this was really interesting for me to look into and see how much people legitimately spend on wedding receptions.  We are planning on having a small reception after the wedding at a house one of our families is staying in so we aren't spending very much money on decorations and it's going to be very informal. These receptions are all really gorgeous though, they just are way out of our price range. 


I really love the look of this reception with the lights hanging from the trees. I also like how it looks like all the centerpieces are small so you can actually see the people sitting across from you. This is by far my favorite reception that I found. 


Week 9- A Little Party Never Killed Nobody, like I said above we are having a small reception after the wedding and it will be at a house we are renting. So we are doing finger foods and sandwiches with our wedding cupcakes. We aren't spending a lot of money on food and our families are helping us make everything so it's going to save us a ton of money which is really nice. These all look like great ideas though and I think you could find affordable options.


I like the idea of having food platters set out for everyone to eat buffet style. This is what we will be doing and it seems like it will be the easiest option in our informal setting. I think that you can still have good food and a good time on a budget and that's what we are set out to do! 

Week 10- Let the Games Begin, since we are having an informal reception we aren't having dancing. So we have decided to make some different games for people to play and to entertain everyone. We thought this would be fun for everyone. 


I really love the idea of this giant Jenga game. I think this would be so much for to play and I'm trying to talk Jarr into making one for the wedding. Hopefully it will work! 


Week 11- Can I Get Your Autograph? I really didn't want to go with a traditional wedding book after seeing all of the cool ideas on pinterest and the blogosphere. So I had a lot of fun looking up different ideas for this post and really got some good inspiration. 


I really love the idea of having your guest sign a globe where they think you should travel too. I would love to have people do this and then try to actually travel to all of those places. I don't know if Jarr would be up for this, he doesn't like to travel. But I'm sure I could talk him into going with me! 
  

Week 12- Eat, Drink, and Be Married, this was a really fun thing for me to look up because we are wanting to have some fun drinks at our reception. This was a great way to get some good recipes and see how other people have displayed things. I really like the way all of these are set up and I'm looking forward to using this inspiration. 


I like the idea of having a variety of drinks for people. Some adult beverages thrown in and plenty of fun for everyone! I also love that these drinks all have labels so people know what they are. This is a must for me at any party. 


What was your favorite Wedding Wednesday post or the most helpful?


Photobucket

I'm linking up at these parties!

Wednesday, May 20, 2015

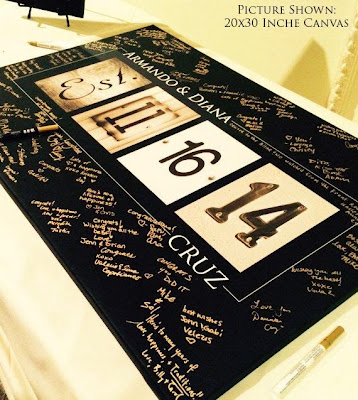
WW- Can I Get Your Autograph?

Its that time again! Another edition of Wedding Wednesday is here, this week I'm going to talk about something that has become super fun. To catch up on all the previous Wedding Wednesday's go here and find out about every week! I really love all of the new ideas for wedding guest books and I think that this is a great way to get something you can use in your house for home decor or that you can keep for years that isn't just a book with people's names in it. So today I'm going to share with  you some of my most favorite guest book ideas.


My sister did this and I really loved it when she did. I love the idea of making a book with your engagement pictures and having your guest write you notes as your guest book. The only problem with this is if you have a wedding with 200+ guests this could take a long time for people coming in to the wedding. 


I really LOVE the idea of using a globe as a guest book. You can have your guest pick a place they want you to travel and sign there. I would try to make this part of my bucket list and visit those places if this was my guest book. 


This sign is such a cool idea. I really like how they have put the heart with love in it, you could also do your initials or last name. The only thing I would do differently is have my guest sign with a color different from the heart. I think doing two colors would look really cool. 


I have never seen this at a wedding but I really like the idea of using your wedding date with fun pictures. This is such a unique idea and would look great in your house after the wedding. Plus reading all of the nice messages for years to come would be really nice. 


This is a super unique idea and could be displayed just about anywhere in your home. I like how they have bigger hearts with the couples names in the middle and then you can write a message or your name on the hearts the guest sign. I think this is super cute and different. 

Which guest book idea is your favorite?

Photobucket

I'm linking up at these parties!

Monday, May 18, 2015

Writing Thank You Cards

Something I have come to appreciate during this wedding adventure is a nice thank you card. I believe that when you get a gift you should always hand write thank you cards to the person who gave you the gift. This is common courtesy and I think that even with the sometimes hundreds of gifts you might get during a wedding you should still write everyone a thank you card.


So today I'm going to share with you a few tips that I learned while writing our thank you cards for all the gifts we received. Some of these can be used for writing any thank you card and some of these are just things I think make it more personal.

1. Try to have all of your thank you cards mailed two weeks after the event. We wrote all of our thank you cards the day after each of our wedding showers. This made it easy to remember what everyone got us and to make the cards more personal.

2. Always mention the gift you received. If it was money we said, "thank you so much for the card and gift" this lets them know that you did receive what they gave you. It also lets people know you looked at all of your gifts.

3. Try to mention how you will use your gift. With cookware I said, "I couldn't wait to use it in our kitchen." I also said about money, "that it will help with all the expenses of moving/the wedding/the honeymoon."

4. Make sure you spell everyone's names correctly, there is nothing worse then getting  a thank you card and having your name spelled wrong.

5. Buy a box of thank you cards at Hobby Lobby or Michael's. This saved me a TON of time, I got 2 boxes of 50 blank cards and the extra's I can use for other things later.


6. If you get a gift from a family, this happened a lot with us. We sent one thank you card to the matriarch of the family. So the parents got the card and we addressed it to the Smith Family. This may not be the  most correct way to do things but it was the simplest especially when we didn't have addresses for everyone.

7. Make sure you express your gratitude but try not to be repetitive. I know this is really hard but I tried to mix up what I said in the cards.

Example: Thank you so much for the crockpot. We really appreciate the gift and look forward to using it in our kitchen making meals together. Thank you so much for the support.


How do you write thank you cards? Do you have a special trick?


Photobucket

Tuesday, May 5, 2015

Asking My Maids

So in the spirit of sharing all my DIY wedding projects with you guys I wanted to share with you how I asked my bridesmaids to be my Bridesmaids. I made them all boxes with their monograms on them and filled them with fun goodies that fit their personalities. I'm going to share with you step by step how I made these boxes so you can make your own! This is very simple and you could definitely make this a gift for any occasion!

Above is the finished product, this is what the inside of the box looks like once everything was put inside. The first thing I did was look at Michael's and Hobby Lobby to try and find the right size box. I wanted them to be a pretty good size but not huge. I also wanted them to be deep enough to fit good stuff. A few of my girls got planners with their box as well as the above stuff so I needed them to be big enough for the planner. 


This box I got from Michael's and it is a little bit different from the others because it was for my matron of honor. So I just got her box a little bigger, everything else is the same as the other bridesmaid gifts. 

My first step was painting the whole outside of the box white, I just used a basic white from the craft isle. I thought that white would be good because it will match everything so the girls can use the box.


Then I picked out some fun craft paper and used this to line the inside of the box. On the top of box I decided to go with a fun glitter paper. I got this at Michael's also but I'm sure you could get it at any craft store. To get the paper lined up in the box correctly I did it the simplest way possible. I laid the paper on the inside of the box and used some scissors and trimmed the edges a little at a time until it fit. It took a little white but after much debate and a few trial and errors this seemed like the easiest way. 


Then I used glue dots to attach them to the box. I put a ton, I don't know if you can seem them but they are all over the back of the craft paper and I put some on the wood box also. I didn't want the paper falling off so I went a little over board. 


This is what the top (left) looks like after the craft paper is attached. I decided to go ahead and paint the inside top edges. I thought it looked more finished this way. I only did this on the top though. I figured the bottom wouldn't be noticeable once the box was full. 

This is the bottom (right) of the box once the craft paper was put in. I followed the same steps for the bottom as I did the top, trim with scissors and then attach with several glue dots. I also pressed down on the craft paper pretty hard to make sure that they seemed attached.


This is the inside of the box with the craft paper. I thought a full view might show you better how it looks with the craft paper inside it. 


Above you will see what I put inside of this box for my matron of honor. My bridesmaids got all of this except the note pad- they got a planner instead and no hair ties. I wanted to make it special for each girl so I got them fingernail polish colors I thought would fit them and the bridesmaids all got planners that went with their personalities. 


With the help of my future MIL I made these monograms with her cricket. We used the sticker paper and each girl got a different color. I went with their favorite colors and I think it turned out well. I also put a coat of mod-podge on top of the stickers to make sure they wouldn't peel up. 

If you don't have access to a cricket you could always use stencils to paint on their monograms or put it on craft paper and mod-podge it down on the boxes. 


Here is a large picture of the inside of the gift boxes. I think they turned out really well and they are a fun gift that the girls could use for anything. 

How did you ask your maids? 

Photobucket

I'm linking up at these parties!
Coastal Charm 

Wednesday, April 29, 2015

Wedding Wednesday- How About That Party

When you are attending a traditional wedding you expect to go to the ceremony, maybe a cocktail hour, and then a reception. This reception generally serves a meal and has cake and drinks for all to enjoy. Well at these receptions people tend to get very lavish on their table decorations. The party is much more about how things look and what the theme of the party is, this is where things can get out of hand. So today I'm going to share with you some gorgeous and slightly elaborate reception tables.


I really love the red in this reception, I know that it must have been very well planned but I think that it was very well done. I also like how they have the clear vases and the candles with different height center pieces that give you lots of depth and interest in the table. 


These reception tables scream garden party to me. This look is very classic and elegant, I like the small centerpiece of roses and how every chair has a back cover. This is a very traditional wedding set up which is always beautiful and sophisticated.


Let me be honest, the lights are what captured my attention and I would have loved to see this in real life. I have no doubt this looked like a fairy tail. I also like how the flower center pieces are long and narrow but also short, this gives plenty of space to mingle with your table mates and to see everyone. 


Once again I love the lights in this reception, it looks like a woodland dream you would find in Neverland. I really like the simplicity of the table piece. The wood with the tin cans and flowers on them are perfect with the lights and other gorgeous decorations. Anything more would have been too much, this turned out quite lovely. 


I really love the actual tables at this reception. I also like the combination of candles, greenery, flowers, and vases. They work well together and compliment the gorgeous table tops extremely well. This is perfect for country club or vineyard wedding. I think this was very well done and unexpected for a wedding reception.

If you are just joining Wedding Wednesday catch up on every week here. 

Which one is your favorite? What kind of center pieces do you like for weddings?

Photobucket

I'm linking up at these parties!
Coastal Charm

Monday, April 27, 2015

Making Your Own Wedding Bouquets

As I've talked about on Wedding Wednesday's  it is easy to let your budget get out of control when you are planning your wedding. So in order to save some major money on the wedding I decided to make all of the bouquets and boutonniere's for the wedding. This has saved us a HUGE chunk of change to spend in other areas of the wedding now. So I'm going to share with you my easy way to make your own wedding bouquets.  


The first thing I did was go to a wonderful place called Basket Market in Oklahoma City. Now what is this wonderful place you ask, well it's like a wholesale hobby lobby. That's right, its wholesale hobby lobby, they sell hobby lobby things in bulk. So it is PERFECT for making a ton of different things for your wedding. I also watched their monthly deals to find out when the bulk box flowers were on sale and that's when I bought our flowers. 


The box flowers look like the above flowers. They are each single stem flowers that come in boxes of 6-12 stems. They have almost every kind of flower in every color, so it made things very simple when I was trying to decide on what kind and type of flowers I wanted. And in case you were wondering yes I was that extremely annoying person who would pull out a few stems of each box and bunch them together to try and find the right flowers for my bouquets. 


Each flower stem had 3 or 4 leaves attached so I made sure to strip the stems bare. This made it a thousand times easier when I was bunching them together. I also trimmed the stems all as close to the same length before I started bunching them together. If you have wire cutters that will make this process a lot easier. I tried to make sure my bouquet base was long enough to comfortably hold with both of my hands, this will be up to the preference of the bouquet holder. 


After I have done this will all of my flowers for the bouquet I then spent approximately 20-60 minutes trying to decide exactly how I wanted the bouquet arranged. I just did this with my hands, there are a million tips to use rubber bands, or floral tape, I used my hands. If you try those other options like I did originally you end up getting annoyed because it doesn't stay how you want it just right. 

Now the best part about these stems is that they have metal wires in them you can bend to make your bouquet lay right. This helps with the flowers position and gives you the ability to have your OCD make the flowers perfect.  


My next step was putting all of the stems together. Why yes, I did use duck tape. This was possibly the best idea I had come up with so far. I have zero fear that my flowers will fall apart or get damaged with my duck tape method. I know they will be secure and exactly how I want with the duck tape around the stems. 

I did add so leaves from the stems around the bottom of my bouquet just to add some more depth and interest. I did the duck tape around all of the bare stems first and then I did small pieces of tape on each leaf piece. This gave me the ability to pull them off and rearrange them until they were how I wanted. Then I did a couple (5 times) of duck tape around the top to make sure they were all secure. 


After the duck tape I wanted to cover my stems. So I got some ribbon that I had picked out and used Glue Dots to attach them to the base of the bouquet. I put several (as many as possible) glue dots on the actual base of the bouquet as well as several on the ribbon and made sure to overlap the ribbon a little over each strand. This ensured that no duck tape was seen and it made almost every single row of ribbon attached with glue dots. I used several dots at the top and double looped around the top and did the same at the bottom of the bouquet. 


As you can see at the bottom of the bouquet the ribbon is just attached with invisible glue dots. I also made sure to burn the end of my ribbon so that it wouldn't fray. I covered all the way to the very edge of the stems because they were hideous after being trimmed. 


And this is the final product of my wedding bouquet. I really love peonies and blue and yellow are our colors. The bridesmaids will be wearing blue dresses so I wanted to incorporate the blue and yellow somehow in my bouquet. I really like the way the peonies and garden roses look together and it seemed like the perfect bouquet to carry down the isle. 


I followed the exact same steps for the bridesmaid bouquets. They were actually a lot easier because they were so much smaller. This made it much easier to keep a good hold on the flowers. 


My wonderful flower storage system until the wedding, I found a box and poked holes big enough for the base of the flowers to fit through. This will keep the flowers from being smashed and loosing their shape before the big day. It also makes things really easy when you are transporting things. 


There is my simply tutorial on how to make your own wedding flowers. What do you think of my bouquet strategy? Did you make your own bouquet or have a florist make one for you? 

Photobucket
Weekend Bloggy Reading

Wednesday, April 22, 2015

Wedding Wednesday- Isle Decorations

If you are new to our Wedding Wednesday update make sure to check out the other posts about bouquets, the dress, choosing colors, location of love, wedding favors, and cakes. I am trying to cover everything that has come up for me but if there is something specific you would like to hear about please let me know!

This week I am talking about isle decorations, the thing I have learned about this is you can make this part of your wedding  as cost effective or as expensive as you want. There are affordable ways to decorate your isle while still making a statement. Some of these are budget friendly while some of these could cost a bit more then some brides would like to spend. I think there are ways to still have the wedding of your dreams while doing things within your budget.


I really like the idea of some form of bow in your color scheme on the end of every other row of chairs. This is perfect for an outdoor wedding with a gorgeous view. You don't want anything that will take away from the view but you still want something that will add a little extra. I also really like how at the top of these bows they have added a little bit of babies breath, it is the perfect touch.


I'm not going to lie, I LOVE lanterns. I like them in my house, in my wedding, in my life. I am a huge fan of the lantern but, this could get very expensive. I like how they have spaced these though so you don't have to use near as many. I also like how they have the touch of flowers at the top of the pew, this gives a good pop of color and helps break up the dark of the pew and the floor. 


Now this is a simpler version of the previous isle decorations. I like how they have the flowers with a longer ribbon on the pew ends and the flowers on the ground lining the isle. I think this is a really good idea for a church that may or may not have some ugly carpet that you are trying to hide. 

The link to this image was not available anymore, if you know who should receive credit please let me know! 

I really like the idea of the tree stump with some wild flowers in a vase on top of it. The colors and textures in this are perfect for an outdoor wedding. The hardest part of this would be finding the tree stumps. The flowers are gorgeous though and I really like the different colors they have incorporated here. 


Here is another version of the flowers and candles. I like how the flowers are a different color then the candles here and I really like how they have three different sizes of candles to add some depth to this display. I think that this is a really pretty idea and would be great at a night wedding. It would really high light the romantic side.


And just for kicks here is one more different version of the lantern and flowers. I like how it looks like the flowers have fallen out of the lanterns here. I think this is very pretty and would look good indoor or outdoor.


What kind of isle decorations do you like for weddings? Are you a flower and lanterns person?

Photobucket

I'm linking up at these parties!
Coastal Charm